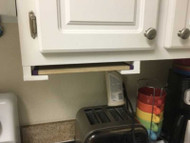
Cutting Board Storage in 4 Easy Steps
Posted by Admin on Jun 22nd 2021
Cutting board storage is invaluable for keeping your countertops clean and protecting your dishes from aggressive knife work. With their frequent use, it only makes sense to always have cutting boards at the ready. There is a wide variety of cutting board styles available, so it can often be most efficient to create a custom storage option.
If you have the space inside your cabinets, you can attach wire baskets to the inside of your cabinet door for your cutting boards. However, if you don't have enough space inside your cabinets, then you will need another option. In this blog, we are going to take a look at mounting a cutting board storage rack to the bottom of your upper cabinets.
Materials You Will Need
- 2 Wood Moldings
- 4 Wood Blocks
- Wood Glue
- Drill
- Screw
- Measuring Tape
4 Steps for Cutting Board Storage
1. Measure Twice, Cut Once
This quick cabinet modification requires you to first make a cutting-board holder from two pieces of wood moldings (trims work too) and four wooden blocks to create height. In the end, you will have a two-piece cradle that mounts beneath your cabinet to store away your cutting boards.
Take measurements to find the length of your cabinet’s bottom to figure out how long your moldings can be. When determining the height of your wood blocks, keep in mind that you need to create enough height for as many cutting boards as you intend to fit between the moldings and your cabinet’s base.
If the cabinet has an uneven bottom (like mine does), then remember to compensate for its differences when planning your two holder pieces.
Once you have your measurements all figured out, head to the hardware store to purchase the wood pieces you need to fashion your holder. I ended up grabbing two moldings and cutting one long piece of thick wood to size with a handsaw to get my blocks.

2. Shaping your Holder
Now that you have your wood moldings and blocks, use wood glue to adhere them together so that they take on the cradle you need.As you can see, I had to compensate for the differences between the depth of my cabinet’s base and its edges by adding extra height to one of the corners with a fifth wood block.
3. Pre-Drill and Drill
To give yourself an easier time with accurately aligning the screw holes of your holders to the holes of your cabinet, it’s best to pre-drill. First, take each of your holders and drill connection points in all their blocks so that the holes penetrate all the way through the molding.
Next, going through the holes you just made in your holders as a guide, drill into the base of your cabinet so that each hole in your holder perfectly matches the holes in your cabinet.

4. Mount the Holders
Once your screw holes are made, it's finally time to mount the holders and form your cutting board's cradle.
Position your holder so that the holes you’ve made are in sync, and connect your holders to your cabinets with screws long enough to drive through the entire height of your holder and securely into your cabinet. Once your holders are firmly mounted, feel free to dab some paint on the exposed screw heads so that they match the color of your cabinet, and you’re all done.
Now grab your cuttings boards and introduce them to their brand new, and much more conveniently located home! Follow our blog at CabinetDoorMart for more DIYs.
Finishing Up
In these four quick steps, you will have a handy storage area for your cutting boards. This is only one of several ways to make creative, DIY cutting board storage, so don't be afraid to experiment with different ideas. Also, consider your specific cutting boards so that you make the storage large enough. And, if you are looking for a new cutting board, the New York Times has three great recommendations!
If you are ready to start ordering or if you need assistance, please feel free to give us a call at 1-844-326-6680 or an email to info@cabinetdoormart.com.


